When I was younger I did not disassemble broken electronics and look at how they worked. I don’t know why. Maybe because I did not have my own tools, looking for the correct screwdriver in my father’s toolbox was a hassle. Maybe because I was just not that into electronics. What has changed? For one, I now have an iFixit PRO toolkit; therefore, I have this simple urge to use it, to open something up, to look inside. Secondly, at my current age, it just seems interesting. I have always thought, if I had my own garage and a car, then I could do hours and hours simply by changing a screw or buying a new part and putting it in. But I don’t have a car in Brussels yet. What I do have is a broken flat iron that my lovely woman used for a couple of years.

How did we know that it was broken? When Laura was trying to iron (or straighten) her hair, as she plugged the iron into a socket, it began to emit smoke. When it started to produce smoke she immediately unplugged it. Thus it was presumed broken or unusable and we ordered a new one from Amazon. I asked Laura if I could take it apart and she happily agreed. Lucky me. Thus this disassembly adventure began.

I did not expect that I could fix it. If you are thinking that this is going to be a repair article then you are mistaken. I took it apart, I tried to see what the issue was and that was it. In the end, I did put together all the plastic, but I left out the wiring. The photo above shows the first two screws that you need to remove when starting the disassembly.

Once you unscrew those first two screws you can remove the plastic wire connection cover and disconnect the wire. I must admit that this step was not immediately clear. Yes, I started with those two screws, but after those I began to unscrew the other two visible screws. And that was a struggle since I could not easily get to them with my screwdriver. I struggled. I managed to unscrew one by using a driver and tweezers, but I was not so successful with the second one. After trying for a while I began to look at how I can separate the straightening plates.

Only by using the metal spudger was I able to remove two screw covers to access the screw that was holding both plates together. Three screws off (technically four, but that fourth screw does not help at this point), and both straightening plates can be separated.

Once both plates are separated I could unscrew the previously unscrewable screw and access the wiring and see the electronics. Worth mentioning that to remove the plastic I used the iFixit Jimmy. A really handy tool that you need to be careful while using. Trust me, since I somehow managed to cut my finger.

Currently, I am not that knowledgeable in electronics. This is the first electronic device apart from iPhones that I have disassembled in a long, long time. Thus I don’t know if the part you see above is the reason why it started to smoke. The wiring on the plastic chip looks burned. I honestly don’t know if it is supposed to look like that or did it indeed become too hot and started to emit smoke. What is the reason behind it? My first thought it age.

Above is the ceramic heating plate and the heating element together with the wiring. I made a quick Google and it seems that you can order these heating elements from AliExpress. At first, I did try to gently remove the heating element from the ceramic. With one plate I was successful, but the other one seemed stuck. As you can see I managed to break the wiring from the heating element, thus a complete reassembly is no longer possible. But at least now I know, if needed in the future, that you can order online the heating element separately. Would it be worth it? Probably not, since it needs to be shipped from China and there is no guarantee that will not get lost during transit.
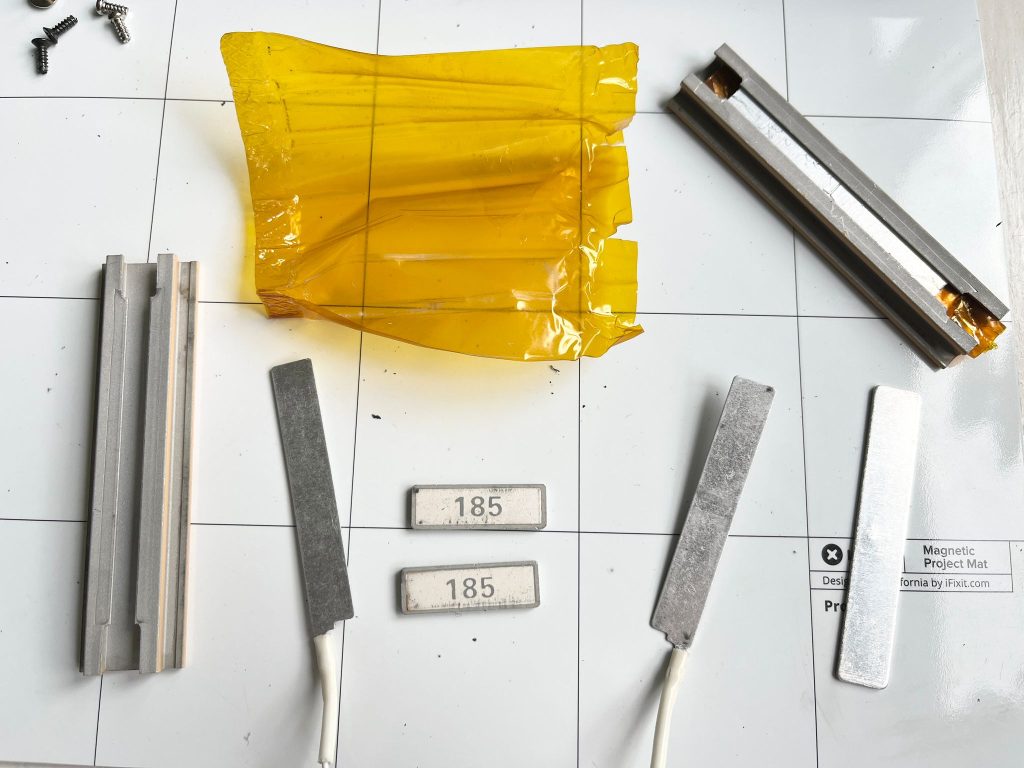
The heating element is disassembled. I could not find a description of these parts. But again, it is interesting to see how it works. It looks and feels like ceramic, but it could as well be tourmaline. What are those two parts with the number 185 on them? My guess is some kind of mineral that is heated up between the two wired aluminum plates. The electricity heats it up and it in turn heats up the ceramic plating (left corner and top right corner of the photo above) thus allowing it to be used for hair straightening.

Once everything has been disassembled you get to see how much plastic is used.
If you have ever wanted to know how a flat iron straightens hair then here it is according to Wikipedia: “A flat iron or straightener, uses heat to change the structure of the hair to make it straight and smooth. The way they work is by breaking down the positive hydrogen bonds in the hair’s cortex. The bonds become broken and the hair is prevented from holding its original form. However, if the hair is exposed to moisture, it will re-form the hydrogen bonds and go back to its original form.”

As I previously mentioned, this flat iron had only seven screws. All the same and could be opened with the same bit driver.

Everything has been disassembled. This has been the first time when I had to use the iFixit Jimmy and the metal spudger. I enjoyed every second of it.

In the end, I assembled the plastic. It is an easy device to assemble once you know how it has been put together. Now the hardest part is going to be to find a place in Brussels where to dispose of broken electronics. I am not quite sure but I think there is a place near my job.
There you have it. Disassembly of a broken flat iron.

One more thing. I was really surprised to learn that the socket wire is connected to the main device with this connector (photo above). A few months ago Laura said that there is a connection issue, namely, it does not heat or does it mildly. My first thought was that the socket wire is damaged. From my visual inspection, it seemed that the wire and the connection socket were fine.
Kind regards,
Olaaf